
 en
en
 CHAT WITH GODLIKE TEAM


Minecraft Shelves Guide: Recipe, Storage, Powered Loadouts

- 6 min read
- 1 views
- 5 likes
In best Minecraft server hostings shelves are a new, display‑first way to keep essentials within arm’s reach. Think of them as tidy, wall‑mounted cubbies that always show what’s inside and, when powered, can swap gear directly into your hotbar. This guide covers crafting, storage limits, how powered shelves work, and practical setups for every playstyle.
TIP
What Are Minecraft Shelves?
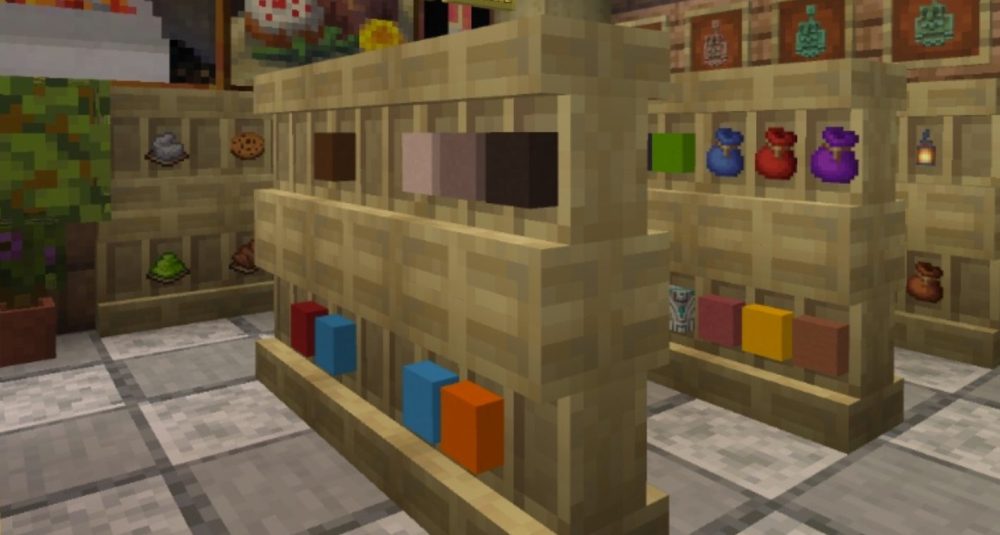
Shelves are storage blocks that visually present their contents on the block face. Instead of opening an inventory, you glance at the shelf and immediately know what’s there, perfect for bases, farms, and communal hubs where quick restocks matter.
- Always visible: Items placed on a shelf appear on its front, like a neat row of mini‑displays.
- Grab‑and‑go: Interact to place or take the whole stack from a slot, fast, no menus.
- Made to be seen: They double as decor - organize a workshop wall, a pantry, or an armory and it stays readable at a distance.
Shelf Recipe (All Wood Types)
Shelves can be crafted in every existing wood set, including Overworld and Nether woods like bamboo, crimson, and warped, so they match your build palette.
Recipe:
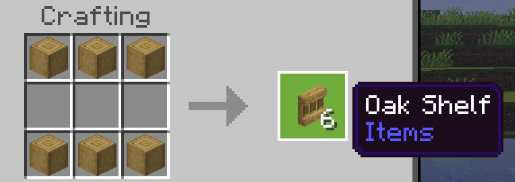
- Gather six stripped logs of the same wood type.
- At a crafting table, fill the top row and bottom row with those stripped logs (six total).
- Receive six shelves that match the wood you used.
NOTE
Because the output mirrors the input wood, you can color‑code areas of your base by wood family (e.g., bamboo shelves for building blocks, cherry for food, warped for tools)
Minecraft Shelf Storage & Usage
- Capacity: Each shelf has three item slots. Each slot holds one full stack.
- Placing items: Interact with an empty slot to store a stack; the item appears on the face of the block.
- Taking items: Interact the displayed item again to retrieve the entire stack instantly.
Placement best practices
- Mount shelves at eye level in high‑traffic spots (base entrances, farm exits, trading halls) so you can restock without breaking stride.
- Use rows of shelves to create a “restock lane” for rockets, torches, golden carrots, blocks, and utility gear.
TIP
Powered Shelves (Redstone): Instant Hotbar Swaps
Shelves get a major upgrade when supplied with redstone power (for example, from a torch, lever, or any powered line):
- Hotbar swap: Interacting with a powered shelf automatically swaps the last three slots of your hotbar with whatever the shelf contains.
- Full loadouts: Place three powered shelves side by side; one interaction on each can rotate your entire hotbar in moments.
- Visual cue: A powered shelf subtly changes appearance. If the vertical divider lines between displayed items are still visible, it isn’t powered yet—apply power and they disappear.
Powering options
- Always‑on: Attach a redstone torch behind the block.
- On‑demand: Place a lever or button feeding a short line of dust into the back of the shelves.
- Step‑and‑swap: Run power from a pressure plate in front of the wall so swaps happen as you approach.
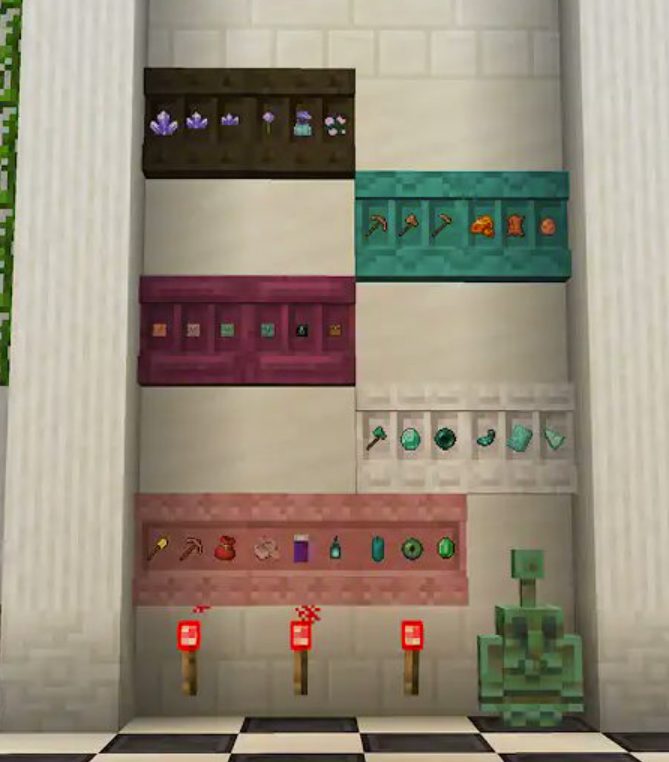
3-Shelf Loadout Station (Quick Build)
You’ll need: 3 shelves, a short redstone line, and a power source (torches, lever, button, or plate).
- Place three shelves in a horizontal row at eye height.
- Run redstone dust behind them; hook up your preferred power source.
- Load each shelf with three stacks that map to your hotbar’s last three slots.
- Interact to swap; repeat across the row to cycle a full hotbar.
IMPORTANT
Keep slots 7–9 of your hotbar reserved for “context gear.” That way, swaps never scramble the tools you always carry in slots 1–6
Best Shelf Loadouts (Practical Setups)
- Mining ⇄ Building: One shelf with food/torches/rockets; one with pick/blocks/scaffolding; one with utility (bed, flint & steel, spare tools). Swap as you leave the mine or return to the build.
- Travel kit: Elytra, rockets, and food staged for quick departures.
- Boss prep: Curate shelves for each encounter, heals, resistance items, and specialized weapons, so you can re‑arm at an “armory wall.”
Shelf Organization & Design Tips
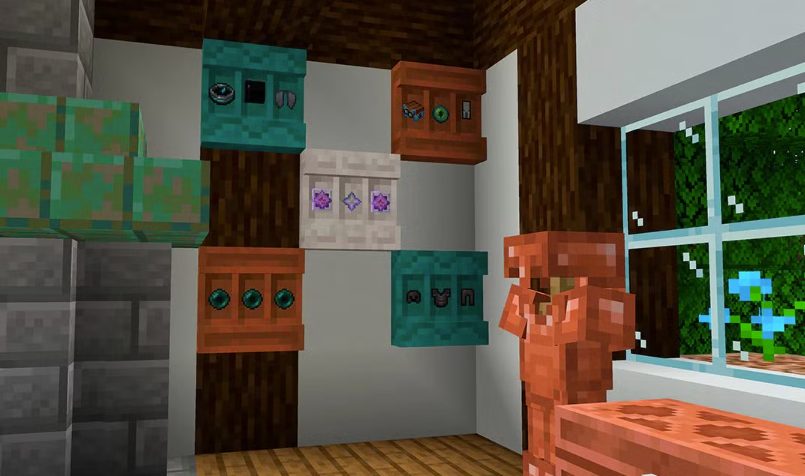
- Color‑code by wood: Use distinct wood types to signal category at a glance.
- Zone your base: Put shelves where the need arises - by a mob farm’s exit, at a Nether portal room, or outside a quarry, so supplies live where they’re consumed.
- Label lightly: Signs or hanging signs next to shelves help in SMP, but the visible items are often label enough.
Minecraft Shelves FAQ
How many items fit in a shelf? Three stacks - one per slot.
Can I mix woods in the recipe? No. You need six matching stripped logs to craft a batch of shelves.
Do shelves show what’s inside? Yes, each stored stack is displayed on the shelf front, so you can identify contents without opening any UI.
What changes when a shelf is powered? Its appearance and behavior: interacting swaps your hotbar’s last three slots with the shelf’s three stacks. With three powered shelves, you can rotate an entire hotbar in seconds.
Result
Shelves are a new storage/display block in Minecraft that shows items on its face and, when powered by redstone, swaps gear straight into your hotbar. Craft 6 shelves from 6 matching stripped logs (all wood types supported). Each shelf holds 3 stacks; a powered shelf swaps the last three hotbar slots with its contents—place three powered shelves side-by-side to rotate your entire hotbar. Great for loadout stations, base entryways, and farm restocks.
Enjoyed reading this guide? Check out our Blog section to discover even more fascinating insights about your favorite games! Play together with GODLIKE.
Read Next
-
Copper Golem in Minecraft (2025): Status, Mods, Oxidation, Statue Build & FAQ
TL;DR There is no copper golem in vanilla Minecraft server hosting (Java or Bedrock) as of 2025. It was a Mob Vote 2021 candidate and didn’t make it into the base game. You can still use…
-
Minecraft Mods (1.21): Best Mods, Modpacks, and How to Install (Fabric, Forge, NeoForge)
TL;DR In Minecraft server hosting Java mods are .jar files loaded by Fabric, NeoForge (modern Forge fork), Forge, or Quilt. Put the mod in the /mods folder for the chosen profile. Minecraft: Java Edition is…
-
Smithing Table in Minecraft (1.21+): Recipe, Uses, Templates & Toolsmith Guide
TL;DR In Minecraft server hosting, the block’s core purpose is upgrading gear via smithing templates not repairing. The crafting recipe is simple: two iron ingots plus four planks of any wood. What it is: a…


